Saturday, February 1, 2014

Marooned in Maroondah

Thought I share what we went through trying to the recce the upcoming Maroondah trail run by Trails+ :)

If you were extremely diligent with your research, I suppose you would've avoided the few scratch-head moments we went through on the trail.. I couldn't find a great mount of detail from Parks Victoria for this particular region of Maroondah - decided to just set off armed with the route print-out & some info gathered from Google Map..

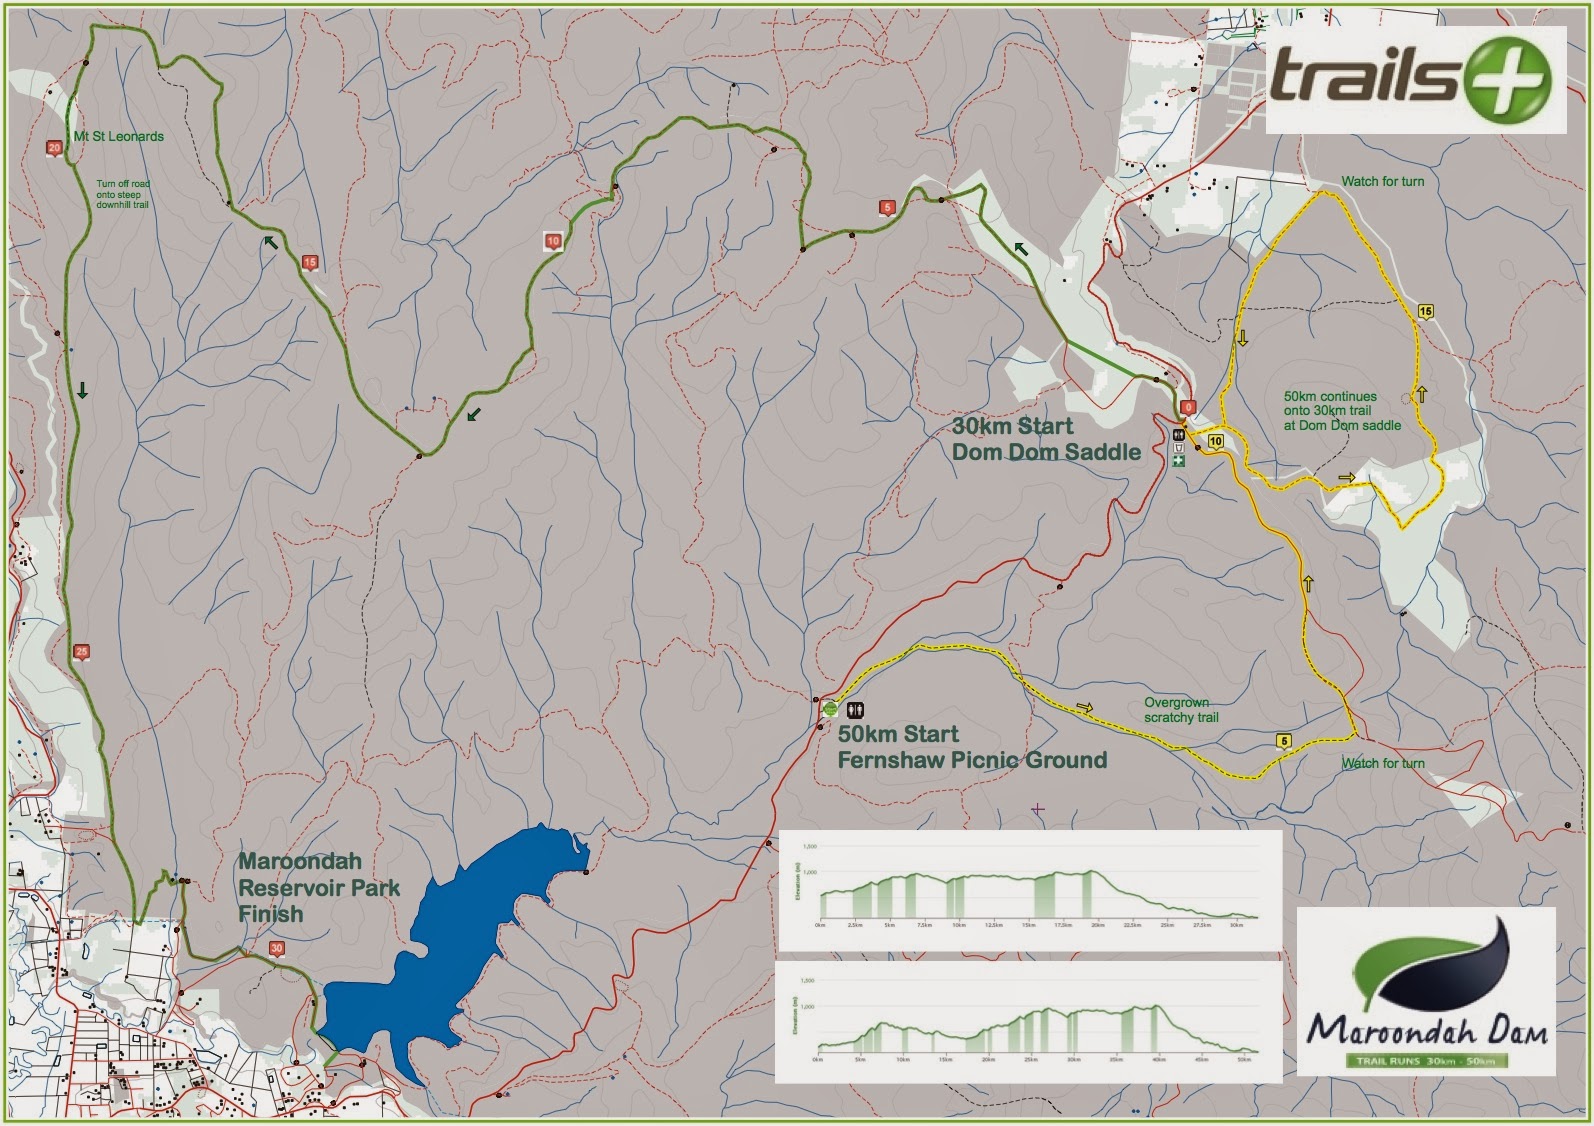
Map of Maroondah trail run by Trails+

Well to start off - we decided to just check out the 2nd half of the Maroondah Trail run, ie. the descent/ascent between the reservoir and Mt St Leonards - a return climb from Maroondah dam would be around 30k & that was the plan.. so our plan was to go backwards along the trail run route before U-turning at Mt St Leonards summit.

Coming from Maroondah main car-park - to get on the official trail run route - just head to the dam wall, and keep going. You will see signs turning out to Maroondah Lookout, and a forest trail back to the car-park. Just stick to the main trail.

Alternative way is via Hendersons Hill route - which isn't as straightforward to find coming from the car-park (but was the one we ended up taking).. regardless both ways will get you onto the next important 3 way junction.

The 3-way junction on the official run map

Echo tunnel is what you want

How it really looks at ground zero.. 

Coming from the Maroondah park, you're presented with Condons Walk Track & Echo Tunnel route at a 3-way junction.. the CORRECT way we should've taken was to follow Echo Tunnel (there's no indication that it leads to Mt St Leonard summit (or Donnellys Weir)).

We ended up taking the wrong way Condons Walk Track - because the trail sign indicated that it leads to Mt St Leonard (& Mt Monda). It was kinda confusing. They both lead to Mt St Leonard except it's a bigger & bushier/slower way via Condons Walk Track.. there's no route info also so we had no idea what kinda walk we were getting ourselves into.


Condons Walk Track is for hikers, not runners.. VERY BUSHY

If you intend to hike Condons Walk Track, you will see a few no-entry trails meant for Park authorities only along the way. And after a very long bushy mushy climb, you would come to the end of Condons Walk Track & out to a junction to Monda Road. At this junction - it's sign-posted - head left towards Mt St Leonard, or right towards Mt Monda. If you're doing the Maroondah trail run, as you run along Monda Rd you will hit this junction as well - just that you may miss it (not exactly next to the main Monda Rd)....

Out from Condons Walk Track, another short section to run
before you eventually see the gates linking to Monda Road

Anyway we ended up doing this loop (anti clockwise):


And as we neared the summit of Mt St Leonard, we stuck to the main Monda gravel road instead of ascending up the summit. If you're taking Monda Road to descend as we have, remember to turn into Road 11 when you see it show up on your left..


Going along Road 11, eventually you will meet the trail to the summit again (from the south) per below picture.

This is how it looks..  Road 11 on the left, trail to summit on the right.
If you see this you're on the right track.. 

You are still on Road 11 as you leave this junction & continue the descent, it's a long way down & there were a few parts of the trail that were overgrown with bushes & the trails were vague - but largely speaking there was only one big trail heading downhill & if you're unsure, just stick to the your left-most trail & keep heading downhill..

At some point Road 11 becomes the Bicentennial National Trail but there's really no way of telling because it isn't sign-posted or anything (except the trail starts to bear a bit to the left). Continue your descent & eventually you will hit a sharp left turn & would be on your way towards Donnellys Weir. From Donnellys Weir it is less than 2km back to the 3-way junction via Echo Tunnel route.

Somewhere along Bicentennial National Trail.. 

You will see this aqueduct between Donnellys Weir & Echo Tunnel

Echo Tunnel.. it really does Echo! After this you will be back in familiar
territory of the 3-way junction.. 


OK folks - hope that's sufficient info to help if you're off doing your own recce or just visiting this part of Maroondah for a hike, get out there & happy running/hiking!


Tuesday, January 21, 2014

Hill Training

Info source: Runnersworld UK

http://www.runnersworld.co.uk/general/everything-you-need-to-know-about-hill-training/159.html


Going Up

It is the moment all runners dread. You turn the corner and right in front of you is a big, imposing hill. But don’t wince, focus. Shift gears both mentally and physically and prepare to attack the hill; don’t let it attack you. Running hills well is all about rhythm; if you let the hill break up your rhythm you will slow dramatically. But if you make the proper adjustments and maintain your cadence you’ll make molehills out of the mountains. Here’s how:

  • As you start uphill, shorten your stride. Don’t try to maintain the pace you were running on the flat.
  • You are aiming for equal effort going up as well as down, not equal pace. Trying to maintain the pace you were running on the flat will leave you exhausted later in the race or session.
  • Take ‘baby steps’ if necessary and try to keep the same turnover rhythm that you had on the flat ground.
  • Your posture should be upright – don’t lean forward or back – your head, shoulders and back should form a straight line over the feet. Keep your feet low to the ground.
  • If your breathing begins to quicken it means that you’re either going too fast, over-striding or bounding too far off the ground as you run.
  • Use a light, ankle-flicking push-off with each step, not an explosive motion, which will waste energy. If the hill is long or the gradient increases, keep shortening your stride to maintain a smooth and efficient breathing pattern. If the gradient decreases, extend your stride again. Try to maintain the same steady effort and breathing throughout.
  • In a race, or when you’re training on a undulating course, run through the top of the hill. Don’t crest the hill and immediately slow down or pull back on your effort.
  • Accelerate gradually into the downhill.

Coming Down

Most runners make one or two obvious mistakes when running downhill. They either sprint, which causes severe muscle soreness later on, or they’re so hesitant to surrender to gravity that they’re constantly braking, which fatigues the quadriceps muscles. The optimum pace is somewhere in between. Try not to let your feet slap on the ground when you are running downhill. Step lightly and don’t reach out with your feet. Slapping can be a sign of weak muscles in the shin area, in which case you need to strengthen them. To help your downhill technique, follow these simple tips:
  • Try to visualise gravity pulling you down the hill.
  • Try to maintain an upright body posture, keeping your torso perpendicular to the horizontal.
  • Keep your feet close to the ground for maximum control, and land lightly.
  • As you increase your pace, emphasise quicker turnover rather than longer strides, though your strides can be slightly longer than normal.
  • The key to efficient downhill running is to stay in control. When you start, keep your stride slightly shortened and let your turnover increase. When you feel in control, gradually lengthen your stride.
  • If you start to run out of control when descending, shorten your stride until you feel you are back in control again.

Saturday, January 18, 2014

Two Bays Trail Run 2014 - Pushing Beyond Blisters!


Yea damn blisters! the toes were clearly in unfamiliar territory crossing the 50k mark, plasters started falling apart, blisters started forming etc.. still just an ultra rookie :)

Anyway it was worth all the pain...

Reasons? GREAT organisation, just like Rollercoaster, you really do see how much effort has been put in, the volunteers keeping the carnival atmosphere going & no doubt the presence of friends who were there to share the pain & joy of the course.. the scenery actually became secondary, I mean it was a nice route & all, but it served to just complement what already was a great event. So now I understand why Two Bays came highly recommended..  very glad we signed up.

Preparation 

We didn't have Two Bays in our radar until early December.. I couldn't even quite qualify to do the 56k last year (only the 28k)! so it was all a bit here-there-everywhere in terms of preparation & my legs only started really twitching in the final days leading up to the run.

It didn't help that I got myself injured 1.5 weeks before run-day, having pushed a bit too hard while training with the wifey in the Dandenongs (we had a great run in the rain tho!) - the upper quads on the right leg was strained. It was going to be hit or miss for Two Bays at that point. Was definitely pretty worried, and could only just focus on recovery stretching recovery stretching recovery & praying for the best.

Training hard. we love running in wet & miserable rain!

Thanks to a miracle medicated plaster (that cost a bomb) my leg was actually back in action just after a few days (brand is Dencorub, check it out!) - out came the paper & pen it was back to studying the route & planning target times again.. anyway, I couldn't ask for more & had to be contented with going into the run without 1.5 weeks of scheduled training runs.

The 777 Plan 

Well I had target times for every 7k but the general plan was to meet a 7hr target - pushing for sub-7 if possible. Try to get to half-way point 28k sub-3 hours and with as much spare time as possible given that the legs will definitely slow down beyond the 30k mark..


Nasty elevations? not crazy nasty I suppose - but an ultra should never be taken lightly regardless especially if one is pushing hard & doing it in an unfamiliar route.. and in my new-ish Rapa Nui shoes too.

Hydration would be 2 bottles - one water, one sports drink + electrolytes. Wasn't sure whether I was carrying too much given there were many aid stations - but I wasn't going to over-think it and with the 2 bottles I was confident I would always have enough water & electrolytes. Brought spare electrolytes tabs for when I would refill the sports drink bottle.

Nutrition - I opted for the usual trail mix, gels, a mini snicker bar. Aid stations would have gels so I just packed only two - was feeling good about nutrition prep since the trail mix did me well during Razorback.

Hawaiian costume - There was some FB discussion in the SCTR group about dressing up for the run (since the event organiser encouraged it!) - we went round to the $2 shop & just got flower garlands, couldn't possibly pull off the sexy grass skirt with my thunder thighs!.. hehe..

The Run

Weather was overcast with a light breeze when we arrived at 6am at Cape Schank - perfect running conditions.. runners were all visibly happy about it.. it would be a day of record-smashing for the fast runners!

Scene at 6am.. promising weather for the day! 
Met up with the SCTR crew - all raring to go! (Photo credit: Jon Lim's iPhone)

Our flower garlands were comprehensively outdone by the crazy Wombat boys Isaac & Tim, who not only signed up at the very last min but came in full glory of grass skirts, flower bras & all.. characters! :D Few of us were still shy but anyway it was hilarious coz we were amongst such serious runners that it was obvious only a handful of runners were in costumes of some kind. It was good to know that the SCTR group not only had running talents but more importantly a great sense of humour :)

0-28k (3:00) - Soon after we were flagged off, we were on single trails & it was funny that after no more than a few mins of running, we had to stop coz there was a massive traffic jam at the park entrance.. ! so much for the adrenalin start! anyway this first stretch was pretty much keeping a steady pace & staring at the bum of the runner in front of me.. :)

The trail started to open up a bit more after 10k, & managed to pick-up some pace. It was quite worrying because I felt that I was already pushing kinda hard & didn't build up much spare from targets every 7k.. I had even skipped all the aid stations (I still had plenty of water thanks to the weather)... but I could only keep going & see how things transpire.

This was somewhere between 10-15k? (Photo credit: Andrew O'Brien)

We had great kids from the neighbourhood hi-fiving us & spraying water just before the 21k mark it was really nice.. glad they were having as much fun as we were!


Generally I was feeling good & moving well - slightly worried that I was pushing too hard & not leaving enough gas for the 2nd half. But I wasn't hitting the target times with much spare time either so I just stayed with my pace. I finally reached the 28k mark around 2:57 hours.. rung the bell with only few mins shy of the 3:00 target..

28-35k (4:10) - The climb back up to Arthurs Seat was expectedly tough I could only walk most of it. Wished I could follow some of the runners who had the legs to run up the hills but I knew if I did that I was gonna just kill myself. Bumped into the wifey on the way up & instead of a sweaty loving hug, we took pics of each other haha.. nonetheless was very happy she was looking strong mentally & physically.


I remained on target when I hit 35k but signs of toe crush was starting to develop after the quick descent from Arthurs Seat.. started to mutter to myself, not sure what exactly but I could tell I was mentally & physically getting beaten up - not just by the toes' discomfort, but with the day getting warmer & my legs were feeling more lethargic. I was sweating a lot & needed to rehydrate more..

35-42k (5:20) - Surprisingly I did faster than anticipated for this stretch & got myself some 20mins of buffer when I reached 42k. Somehow I had become numb to the soreness of the toes but could feel the sun much more by now... my mouth was constantly craving water water water.. I poured water over my head to cool down at the 42k water station, drank my fill & refilled the water bottle to the max - I could see runners before me doing the same, it was going to be a very tough stretch ahead!

(Photo credit: Benjamin Fox / fstop5)

(Photo credit: Benjamin Fox / fstop5)

42-49k (6:10) - Eating more of my trail mix, it was getting dry & hard to swallow, but I needed fuel every 20mins so I just kept munching bit by bit. The tummy was also getting a bit upset from too much sports drink + electrolytes. My body just wanted water. True enough the 42-45k was the toughest 3k stretch for me. I was tired & without a single runner in sight, I remember seeing a big kangaroo hopping away, & the backside of an echinda crossing our trail.. they reminded me to take a moment to enjoy the serenity (not like I could go any faster anyway!)

Fortunately at 45k the trail started going downhill.. like a stuttering stalled engine of a car, I was able to make use of the downhill to jump-start my dying engine - popping in a few more jellybeans, I could feel my 2nd wave is arriving. I remember thinking runners would be loving this event for this particular stretch as well - that the 45-49k gentle downhill stretch was really helpful & invigorating!

49-56k (7:00) - All was going perfect after the last aid-station & I was really cruising.. feeling great I was well on target to hit a good sub-7! The view was opening up too towards Cape Schank.. kangaroos were hopping in a distance & it was just magical (I was probably a bit delirious too)


Hello curious ones! Keep hopping & don't come after me!

AND THEN DISASTER .. as this cruel life would often have it, my joy was short-lived when a sudden sharp pain emerged from my right foot at the 52k mark - it was my little last toe. I had to stop & check.... it was bad. The entire little toe was a giant throbbing blister!! The plaster I had taped over it had come loose & was not providing any protection at all for god knows how long.. I searched my pack & cursed at myself - I had forgotten to bring the Elastoplast. GREAT!

So making use of whatever tattered plaster is left, I tried my best to cover up the blister but to not much avail.. I was in real sharp pain & couldn't really run fast.. I was still hobbling along when at least half a dozen of runners came running pass me.. oh man.. after running 52k all the effort was going down the drain, GREAT!

Feeling frustrated I just kept moving. At that point my big left toe started blistering too (I wasn't running naturally). I will not get defeated by the last 4k! - and certainly not by some blister on some little toe.. But the fact was I couldn't run properly, my foot placement was all awkward, the last 4k was just horrid. I tried to bring my mind far-away from the pain & just focused on staying with the two runners in front of me.

But with every sharp pain it jolted me back to reality. I was pre-occupied with fighting these mini-battles all the way to the very end.. the last 4k easily became the longest stretch on the course.. I swear I could've cried when I finally saw the finishing line.. :)

THE JOYS OF ULTRA eh??

Keeping it together - lucky to still have a sub-7!!! (Photo credit: Steve Taylor / fstop5)

Unfortunately I missed the wife crossing the line! Was still hobbling back from the car when the announcer mentioned her bib number... but what a champ she has been, smiling all the way, yakking to all the volunteers, glad she had fun & what a beautiful strong finish.. good on ya Wifey! :D

(Photo credit: Steve Taylor / fstop5 )


Post-run chill out & making new friends.. :)

Race Summary

What went well
1) Carrying water bottles = did not have to stop at every aid station..
2) Nutrition = had enough when I needed it..
3) Target times for every 7k was pretty spot on

What didn't go well
1) BLISTERS & chafings, not enough plasters / glide for toes / other parts of body
2) Did not pack Elastoplast - must always pack this!
3) Hoka Rapa Nui toe box - still tight, downhill was killing my toes.. need to do something about this

I suppose it was the ultra rookie mistake not being prepared enough for chafing & blisters - especially running with the new-ish Hokas.. nonetheless was very happy the legs were holding up well, ITBs were a little tight but I stretched whenever I had a break & they did not really trouble..

All in all Two Bays 2014 was a fab event - we absolutely enjoyed ourselves! The carnival atmosphere, the weather was great & people still lingering around after the 8 hours cut-off supporting the final finishers. It was just a very positive vibe throughout... truly double thumbs up & all bruised & blistered toes up for Rohan & his team!

(And not just because they take nice pics of us in action... all for free!) More pics here

Once again, thanks for reading folks.. if you have doubts about signing up for Two Bays next year, I hope this post has helped erase those doubts :)

Have a great 2014 & keep running!

(Photo credit: Benjamin Fox / fstop5)


Sunday, December 22, 2013

Hoka One One - Rapa Nui Trail Shoes Review

I've subjected my poor new Rapas to 2 gruelling technical runs to date.. might have been a bit too technical for what the Rapas are optimised for as it has already suffered some terrible battle scars.

Last weekend's Wild Wombat Fat Ass 30 at Lerderderg State National Park was highly technical at certain sections, and while it's painful to see your new shoes being scratched, ripped, shredded, crushed, drowned & pounded by unforgiving rocks, it did push the Rapas to its limits & gave me a very good insight into the world of Hokas.. on that note there are plenty of good reviews out there by more experienced runners and I hope to add my 2 cents here..

Rapas vs Lerderderg.. bring it on

What I'm crazy about:

1) Well.. what else.. the massive cushioning.. :)

Can't say how this compares to the other Hokas in terms of cushioning, but the cushioning has helped tremendously when I wanted to go faster during technical descents, as soon as you realise how much comfort & buffer it provides - your confidence will go up & your legs will be going faster! So whatever Hoka has described on their website in terms of cushioning they have delivered for sure. I can imagine how the bigger boys (ie. Mafate, Stinson) with even thicker cushioning will allow you to crush on whatever the trail throws at you.

Big bad cushioning.. nice & wide

2) Weight = 275g (UK 8)

Not going to put these shoes on the weighing scale to verify its weight but the Rapa's light weight is obvious as soon as you pick it up. Having worn the hefty Salomon XA Pro 3D Ultra 2 for almost a year now, the Rapas were a very nice change. However Rapa's upper construction is simple & uses light materials and as a result does come at a compromise to things like toe area protection & general layers of material across the shoe (see pic below, compared to the Salomon XT Wings). Having said that it has maintained good breathability which is important.

Play nice guys.. 

What I'm not crazy about:

1) Design - Upper

Cleaner days.. 
I gotta come clean.. I'm not a big fan of the general upper design of the Hokas (not just the Rapas). The two elastic strap that allows you to tuck in the lacing just doesn't work for me from an aesthetic point of view! If they were meant to contribute to how the shoe fits perhaps they needn't be shown at all (eg. built under the tongue).

And yea if they were meant to just hold the lacing well - there must be a better lacing design out there (ahem.. *cough.Salomon.cough cough*)

Having said that the side & back profile looks OK. Naturally this is just a personal take, I ain't no Jimmy Choo & designs are completely subjective to personal taste :)

And while I'm on it the color selection for Rapas in Australia sucks are so limited! They have much nicer color selections for the EU models.. why don't we have these Anthracite/Red/White ones?? I tried searching several EU websites but had no luck with sizing and out of retail therapy desperation settled for the ones I have now.. (OK maybe there's a bit of Jimmy Choo in me)

Photo from Hoka One one EU

2) Heel grip & overall fit

Hoka talks about 'bucket seat design' that helps with control & fit. While the midsole felt firm, my heel was sliding a bit from side to side as I went on the technical descents.. thicker socks could've helped I'm sure but the heel grip was certainly not as reassuring as my XA Pro Ultra 3D 2.

And if you study closely Salomon shoes vs the Hokas, you can see how Salomon wraps around the foot & tucks into & under the sole especially in the midsole & heel area - which will no doubt minimize foot movement within the shoe & maximise control on the trails. Perhaps its very specific to one's foot how the overall fit is - but I think tightening the heel area is definitely one area Hoka should think about..

Rapas struggled a bit with the really tech descents..
my heels kept sliding left & right.. 

In summary:

The Rapas will be great shoes for the door-to-trail & moderate technical trails especially if you're going for speed. I have subjected my Rapas to very technical trails to date and while they were fantastic with cushioning, I felt the lugs & outsole on the Rapas were OK but not aggressive enough (which I think for the Rapas is to be expected), but more importantly was the overall fit not being 'wrappy-happy' enough to minimize movement within the shoe & providing total 100% confidence going on the steep technical descents..

Good stuff:
- Light & fast
- Cushioning = very comfy
- Breathable

Wish list:
- Greater feeling of fit & control
- Nicer upper design & material choice
- Slightly more toe box protection

As I type this out & do more reading on the Rapas - I discover that they are now retailing Rapa Nui 2 in the US... mmmmm.. with what seemingly is a sturdier toe box protection! (I could be wrong - not much info found). So if you're thinking of buying, might want to wait a bit longer for the Rapa Nui 2 to be out.. check them out:

 Photo from Boulder Running Company


As always thanks for reading folks - hope you enjoy your Hokas..!

Meanwhile here are more pictures of what my Rapas were subjected to..

Rapas were doing plenty fine on these fire trails.. 
Big cushioning meant I could move fast on the technical descents.. 

Rapas went for some swims.. 

5x river crossings to be exact.. 
Hanging in there.. Rapas looking exhausted after day 1 in action!

Sunday, December 8, 2013

Razorback Run 2013 - At Long Last...


I have been excited over this run since a year ago (I ended up doing the Mirabella Mt Buller Run instead last year)... how time has flown! A year ago when I did Mt Buller I was still settling into Melbourne, & stressed about things like what the future held for me & my wife etc.. Planning a trip to the mountains meant incurring some cost which at that point wasn't financially sound given I was still jobless, but I knew it was necessary in order to replenish my soul to keep the fight going (& to remind myself what I'm fighting for!). Now as I look back a year on, I'm STILL stressed (haha) but mainly over stupider things like work, but certainly more settled (& fatter - thanks to the wife).

And so visiting the Alpines again for the Razorback Run was a long awaited personal treat for myself. A meaningful milestone. I couldn't wait to see for myself the scenic vista that I first had a glance of in the Razorback Run's online flyer from last year. I chose to do the Mt Buller run instead because I chickened out a bit after reading it was a self-supported run & there were very little pictures/info online on what to expect (website has improved a lot since). I was also not very well equipped gear-wise back then.

Anyway, let's dive right in..

Pre-planning/Pre-run briefing

The pre-run briefing & bib-collection was held the night before - I took the day off work in order to have a less stressful drive. We booked 2 nights accommodation at Snowline Motel because we referred to the website & the RD's event notes as to where the briefing was going to be held, but it was then changed to Hariettville Hotel eventually - so do pay attention to RD's email updates leading up to the event.

I believe there was also mention about gear-check during briefing (& so we & many others brought our gear) - but there was no gear-check after all (yes this is trivial I know but just to give you an idea that for this event info provided can change/inconsistent across website/email updates etc. - so once again just pay attention).

Run-briefing was casual & held in the hotel restaurant area with several runners having their dinner. Personally thought a projector should've been set up to talk through the route map visually (especially for people who has never been up the Alpines before). There was a lady who held up the map & asked several questions on the course & was clearly not feeling 100% confident on several points the RD mentioned about. And on hind-sight, the run did see several runners taking wrong turns etc..

pic courtesy of La Sportiva Mountain Series 13

Gear & Clothings

As repeatedly advised by the event info, the weather is prone to change from day-to-day for the Alpines, so best prepare for any type of weather. We packed clothings for both cold, windy & wet as well as hot & sunny. (We got sunny & wonderful weather on run-day but few days on, it was apparently pouring wet & cold & snowing up at Hotham!)

Gear wise, we prepared everything that was required of us in the mandatory kit list, and my UD vest was stuffed to the brim:

Easily few kilos in weight, it is good idea to train with your fully-loaded pack because it definitely made the run that much harder because we were not used to it. As for food - with just one aid-station (for our 42k), you will need plan & pack own food (& emergency food) accordingly.

Here was my spread.. hehe

Bungalow Spur (0-10k)

Runners were still trickling in 5 mins before 6am.. :)

The run began on time at 6am, the run/hike up Bungalow Spur was hard-going because we were of course in a run-event & were pushing to move as fast as we could. Not surprisingly this is the hardest part of the run. Your heart will be pumping & whatever nerves you have before the run will be gone within the first 10mins :)


Bungalow Spur - The Cross (10-11k)

Eventually of course - your hard work will pay off & you will see the beautiful sight of Federation Hut marking the end of the Bungalow Spur slog & the heavenly views would open up before your eyes!

Federation Hut.. 
Leaving Fed Hut & up towards Feathertop
The hills are friggin alive!!

This section will be gentle slopes, pretty runnable (if your legs will still take you) all the way to The Cross, where you will presented with a left turn (towards Mt Feathertop), and a right turn (or straight - towards the Razorback).

The Cross - Mt Feathertop (11-12k)

As you climb up towards Mt Feathertop, it gets increasingly treacherous for 2 reasons - the views get better, and the trails gets more technical.. as you admire the view & lose focus/concentration, you may trip/misplace footing - all of which is still OK if you don't plummet down the ravine that would be inches away from you on either side of the trail.. !!

One runner busted his knee very badly here.. don't take this section lightly!
What did I tell you about the 'killer' views.. 
Mt Feathertop awaits.. 

pic courtesy of Neo Samurai 


This section you will benefit if you have poles with you - helps with balance, footing, not so much uphill but definitely during the downhill section.

Razorback (13-23k) & Back (23-32k)

I'll just let the pictures do the talking.. :)

Looking back towards Feathertop from Diamantina Spur junction.. 
Heading fwd along the Razorback (this guy was going opp way)
Views continue to inspire.. 
Certain sections we were running right at the edge of the slope..
several runners tripped (I did multiple times) so stay focused!
Yakking to friendly walkers 
At the U-turn checkpoint Diamantina Hut (looking back at Razorback)
pic courtesy of La Sportiva Mountain Series 13
I paused at this section & watched top runners zip by.. 

The Razorback section had multiple undulating sections, but nothing too crazy. Certain sections you will run right at the edge of treacherous drops so caution required. Every time I tripped it was because I looked up to check out the views... once again poles would help with going faster on these technical trails - especially the descend. 

Bungalow Spur - Finishing (32-42k)

Pretty straightforward, this section is just 10k of pure pounding of the quads... & felt like it was going on forever. If you didn't train your downhills, you would be cursing a bit over this section. I was just ecstatic that my ITB injuries didn't flare up the entire descend!


We finally crossed the finishing line after 8:40 hours, our goal was under 9 hours and it was great we achieved it and had plenty of fun along the way. Didn't mind at all staying out there a bit longer given it was such a glorious day. You had to envy the walkers as it was definitely a day to slow down & soak in the views up in the Alpines.

Needless to say we'll be back to this region to run/hike/ski perhaps?... but as far as the run goes, what a day & weekend it has been, breath-taking views, gorgeous trails, beautiful weather, no ITB injuries, nutrition & hydration planning went well, loads of pictures taken.. couldn't have asked for more.

Final Thoughts:

1) Poles - very useful for this kinda run..
2) Nutrition - the trail mix prepared by vonsy works very well, kept my energy levels up!
3) UD vest - held up very well in full load, continues to impress!
4) We missed seeing familiar faces!
5) Run organisation was good on run-day, cut-off times were mentioned but weren't strictly enforced, slower-runners have to head towards the pub (where the dinner/presentation would be going on) instead of finishing point & record own time.. might want to take note of that
6) And yes by all means do sign up for this event!

Once again, thanks for reading folks! I leave you with this beautiful sunset at the top of Mount Hotham from the same evening :)

damn I love this place!